Tools & Tips for Water Rocketeers

Applying PU glue with a syringe
![]()
|
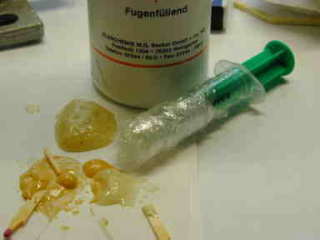
Applying PU glue with a syringeThe tip on my PU glue container PUR-Leim 501 from Kleiberit is intended for construction use and therefore coarse. To apply it I use either matches (remnants of match operation on the photo, left) or, better, a syringe. I suck the honey-like substance into syringe, applying it where necessary. After use I cover the syringe opening with kitchen foil. The glue remains usable several weeks. |
|
If a little bit hardens in the tip, it can be shoved
into the syringe with a nail and does no further harm
to the rest of the glue. As always, use one way gloves
while working with polyurethane glue. It's a nasty thing
on your table, carpet, skin or whatever. |
|
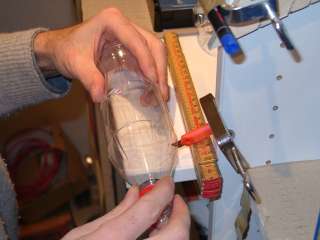
Cut marks on PET bottlesTo make accurate cut marks, use a felt-pen marker taped to a clamp at a vertical board of a closet. Just turn the bottle, holding the bottom of it flat on the surface (works great!) |
|
Cutting of PET bottlescan be done freehanded, but it needs care and gives not always good results. With simple means one can work a lot easier: |
|
The bottle is kept with both hands. Turn bottle against the cutting edge. If you marked the cutting line properly, cutting accuracy can be brought to less than 1 mm without much effort. Safety: retract cutting edge into knife immediately
after EVERY use. |
|
|
Cut marks on FTCsFTCs, the Fluorescent Tube Covers that are not obtainable in Germany and are so very apt to make lean water rockets from, can be marked and cut very simple: I simply open the top drawer (covered with white paper here for visibility) of my desk and put the FTC on it. The FTC touches the grey table top behind and the wall on the left. The left hand rests non-moving on the drawer, felt pen on marking position. Right hand rotates the FTC. |
|
|
Cutting of FTCsThe FTC I got a hold of via list member Tom Lanigan
(thanks!) is quite strong and difficult to cut with
a knife. I therefore use a Dremel type of tool with
a flexible shaft. It holds a very thin (0.4 mm, 22 mm
Ø) circular blade saw. Holding the FTC between right
arm and body, the left hand turns the FTC. A little
exercise helps you make nice straight cuts. The secret
is to push the blade only just below the surface - going deeper
produces mostly undesirable heat. |
|
Guppied nosecones (explained)The form of the nosecone is most important if you want to yield high altitudes with your rockets. On Paul Grosse's site I saw the guppy principle for the first time. My first experiments were interesting but left room for improvement (see photo). By just heating the bottle end, I felt that I have no adequate control of the final form of the nosecone; often I ended up with a bottle end consisting of one hump in the middle surrounded with 5 humps (the remnants from the original bottle form) - aerodynamically better than the bare bottle, but far from the optimum. |
|
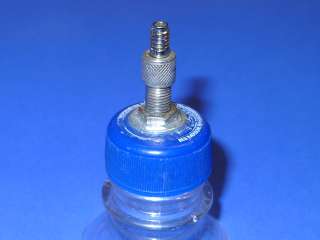
To begin, I made this valve-in-a-bottlecap with a
Woods bicycle valve. Presta or Schrader valves will
do as well (look here
for a pic of Presta and the other valves).
Screw this cap with the attached valve onto the bottle
to be guppied. Then pressurize to 3 ... 4.5 bar. |
|
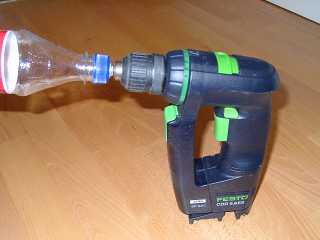
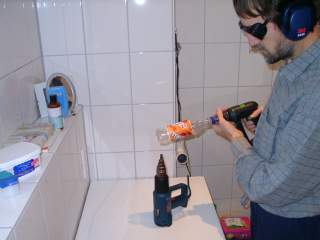
For uniform rotation, I use this cordless drilldriver with slow speed. Lefthand the pressurized bottle. |
|
A hot air gun with a reducing nozzle for good control of the heat distribution. |
|
The process: After a discussion in the WR list Clifford Heath sent me this detailed description: "The most important is to heat the outer part
of the bottle base, not the centre. I hold the bottle
tilted over between 45 degrees and horizontal. The aim
is not to heat the centre of the base much at all -
it starts growing between the humps first. To get a
feel for it, wave your hand over the heat source until
you know exactly where it's hottest and what the heat
spread is, or you can't tell which part of the bottle
you'll be heating. Touch the bottle base to feel which
parts are hotter - you'll get a feel for it. |
|
Thanks, Clifford, for this description - it makes a big difference! With your technique, almost hemispherical nose cones can be obtained. However, not every single bottle behaves the same, some practice is necessary. I found it good to do several bottles in a row to accumulate experience and 'the feel for it'. A bowl of cold water nearby doesn't hurt, in case you want to stop the expanding process quickly. |
![]()
Stand / Last Revision: 11.01.2004


