


![]()
Launch Report 1.1.2003: Hybrid 2-stage Rocket
(Water & Pyro Rocket combined)
Background:
The first minutes of any year are celebrated in Germany with burning lots of firework. So far, I have kept out of this questionable habit mostly. However last year, driven from scientific thirst, I had the idea of shooting one of those readymade pyro rockets into the air with a water rocket (WR) as a booster. During flight, the pyro rocket (=sustainer) should detach itself from the WR and start it's powder driven flight with a good initial speed from high above the ground.
Security:
Even more than on other water rocket projects, security is a major topic here. If you want to do a similar thing by yourself, be sure to think through anything that might happen, and take appropriate countermeasures, at least the ones that I have mentioned. But my list is NOT complete. Do not emulate this project unless you have a very, very solid standing in normal water rocketeering and a very firm understanding of the application and behaviour of the ready-made pyro rockets as well.
I am not responsible in any way if you mimic parts this project or parts of it, even if you follow the security stuff that I mentioned.
In short: Do not copy anything that is described here, and if you do it anyway, do it completely on your own risk. Imagine the head of the pyro rocket coming loose of the attached wooden rod: the head would go berserk, running around very wildly without control, eventually burning people and things around with it's powerful exhaust flame, and finally shooting out the flares, setting everything on fire that comes in contact with it. The flares, containing phosphorus, are probably impossible to extinguish. I hope you got the picture!
Precautions:
It must be avoided in any case that the main body of the pyro rocket, once ignited, can do something else as what it is intended to do. Therefore we did a long test series to ensure that everything works as planned. For this, I had gathered some used rocket torsos from last year. I filled the torso up to the same weight as the new rockets from this year. With these I did a number of test flights, until I could be reasonably sure that the ignited real pyro rocket would fly well. Some of the precautions were:
- The connection between the wooden launch rod and the pyro rocket head must be strengthened with tape - otherwise the high accelerating forces from the starting WR can rip the pyro head off the rod.
-
Keep the acceleration of the WR mediocre by not using any water in it and a pressure below 3.3 bar - for the type of rockets I have used. This eventually needs to be lower with other pyro rockets, depending on it's construction.
If you produce too high an acceleration with the WR, the wooden rod may break (happened to me with the test rocket torso). - The pyro rocket's center of gravity must be perfectly in line with the WR axis. See the picture below: Both assembled stages of the rocket balance perfectly, standing on the small water rocket nozzle.
- The upper half of the water rocket needs to be protected from the hot gases form the pyro rocket - the WR might expl0de if some hot exhaust air (in case of a late start of the WR) or hot ashes from the fuse comes in contact with the pressurized PET material. I used kitchen aluminum foil.
|
|
Detail of the bed for the pyro sustainer rocket. Two caps with holes, the yellow one glued upon the booster's top, the red one screwed on the nose cone, a bottle neck taped to the booster's top. |
|
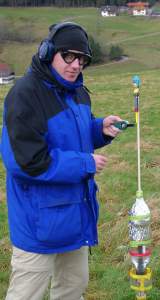
|
Left: the pyro sustainer on top of the booster, a 2 liter coke bottle, balancing on its nozzle. Right: Dirk, today's fuse manager, with eye and ear protection, lighter in hand, while practising the course of events in the field. The top half of the water rocket (booster) is protected with aluminum kitchen foil. A tubular fin (reinforced with yellow tape) is attached to the booster with red tape. The dark grey launch tube can be seen inside the booster. |
|
|
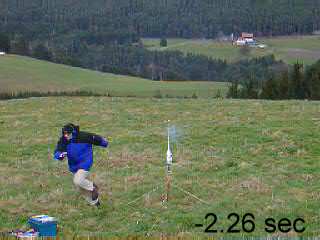
Exact timing of the ignition of the 2 stages was mandatory. In antecedent experiments (at New Year's time) the burning time of the fuse was determined to 3.6 +/- 0.1 sec. We wanted the pyro rocket to fire at about 0.6 sec after start. Dirk screamed aloud "3" when the fuse caught fire, and warped away. His wife Kornelia took over, counting down the seconds: "-2-1-pull". The pics here are from the first start with the ignited fuse on a real pyro rocket, after several test runs with the old rocket torso as the sustainer. |
|
|
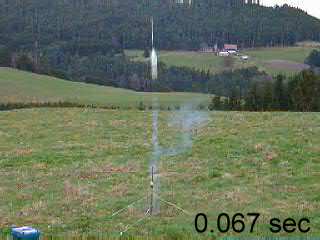
Our timing was perfect. Release of the booster was at 0.0 sec. This is the next frame after the start, both rockets leave the launch tube. The smoke on the right is from the fuse, the "smoke" below the rockets must be from the expanding air. The pyro sustainer has not fired yet. |
|
|
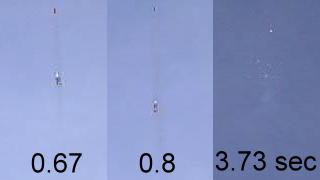
Left: The pyro sustainer (above) has left the booster (centered) and starts firing ... Center: ... gaining more and more speed. Right: the flares were not very impressing because we performed at daylight. Being far away from the camera, the flares were reduced to these blurs in the camera. |
|
|
Today's rocket crew (Kornelia, Dirk, and myself) after the sucessful experiments. Whow, that was exciting, and we had a great time. |


![]()
![]()